It is a phenomenon that leaves Canadian gardeners baffled every spring: you constructed the perfect garden boxes last year, filled them to the brim, but as the snow melts and the cover comes off, you discover a disheartening void. Your Raised Bed Soil has mysteriously vanished, sinking three to five inches below the rim. While your instinct might be to assume the soil has simply compacted or washed away, the reality is a complex biological process that turns your once-thriving growing medium into a potential nutrient desert. This drop in volume is not just a cosmetic issue; it is a critical alarm bell signaling that the organic fuel driving your plant’s growth has been exhausted by the harsh winter freeze-thaw cycles.
Many growers panic and reach for a rototiller or a shovel to churn up what remains, hoping to fluff the soil back to its original height. This is a fatal mistake for your soil’s microbiome. By disturbing the structure, you destroy the established fungal networks that are essential for root health. Instead, a specific, science-backed restoration method—often kept as a trade secret by market gardeners—can recharge your beds for the 2026 season without disturbing a single scoop of the existing earth. The solution lies not in digging down, but in a precise, two-inch layering technique that mimics the forest floor.
The Mechanics of Soil Subsidence: Why Your Beds Sank
Understanding why your soil level drops is the first step to correcting it. In the Canadian climate, the primary culprit is the mineralization of organic matter. Throughout the growing season and even during the initial freezing periods, soil microbes consume the carbon-based structure of your soil (peat moss, compost, and shredded leaves), converting it into energy and releasing carbon dioxide. Essentially, your soil is being ‘eaten’ by the microscopic life within it. This biological oxidation, combined with the physical compression of snow load and rain, collapses the macropores—the tiny air pockets essential for root respiration.
Furthermore, the physical structure of common raised bed mixes relies heavily on organic bulk. Unlike native ground soil, which is mineral-heavy (sand, silt, clay), raised bed mixes often contain up to 50% organic matter. As this matter decomposes, volume loss is inevitable. However, this creates a unique opportunity. The void left behind allows you to introduce a fresh, concentrated inoculation of biology and nutrients.
Diagnostic: Reading Your Soil’s Symptoms
Before adding new layers, assess the current state of your soil to determine the severity of nutrient depletion.
- Pale, Yellowing Leaves (Chlorosis): Indicates severe Nitrogen depletion; the decomposition process has locked up available nitrogen.
- Hard, Cracked Surface: Signs of hydrophobicity; the organic matter has dried out and formed a crust that repels water.
- Stunted Seedling Growth: Lack of phosphorous or compromised mycorrhizal connections due to compaction.
- Green Algae on Surface: Poor drainage and compaction, leading to anaerobic conditions.
Recognizing these signs confirms that your soil requires more than just volume—it needs a biological reboot, and the method you choose to deliver it matters immensely.
The No-Dig Method: Preserving the Hyphal Network
The conventional approach of tilling fertilizer into the soil is increasingly viewed by soil agronomists as destructive. Tilling slices through the hyphae of mycorrhizal fungi, which act as an auxiliary root system for your plants, fetching water and nutrients from deep within the bed. The ‘No-Dig’ or layering method preserves these networks while providing a slow-release gravity feed of nutrients from the top down.
| Feature | Traditional Tilling | No-Dig Layering (Recommended) |
|---|---|---|
| Soil Structure | Destroys aggregates; creates hardpan layer over time. | Preserves micro-aggregates and sponge-like texture. |
| Weed Pressure | Brings dormant weed seeds to the surface to germinate. | Buries weed seeds under fresh compost (deep mulch). |
| Microbial Life | Oxidizes and kills fungal networks via UV exposure. | Protect and feeds the existing microbiome. |
| Water Retention | Decreases retention; increases evaporation. | Increases retention by reducing surface evaporation. |
By adopting the No-Dig philosophy, you are essentially treating your Raised Bed Soil as a living organism rather than an inert medium, preparing it to accept the ‘Black Gold’ infusion.
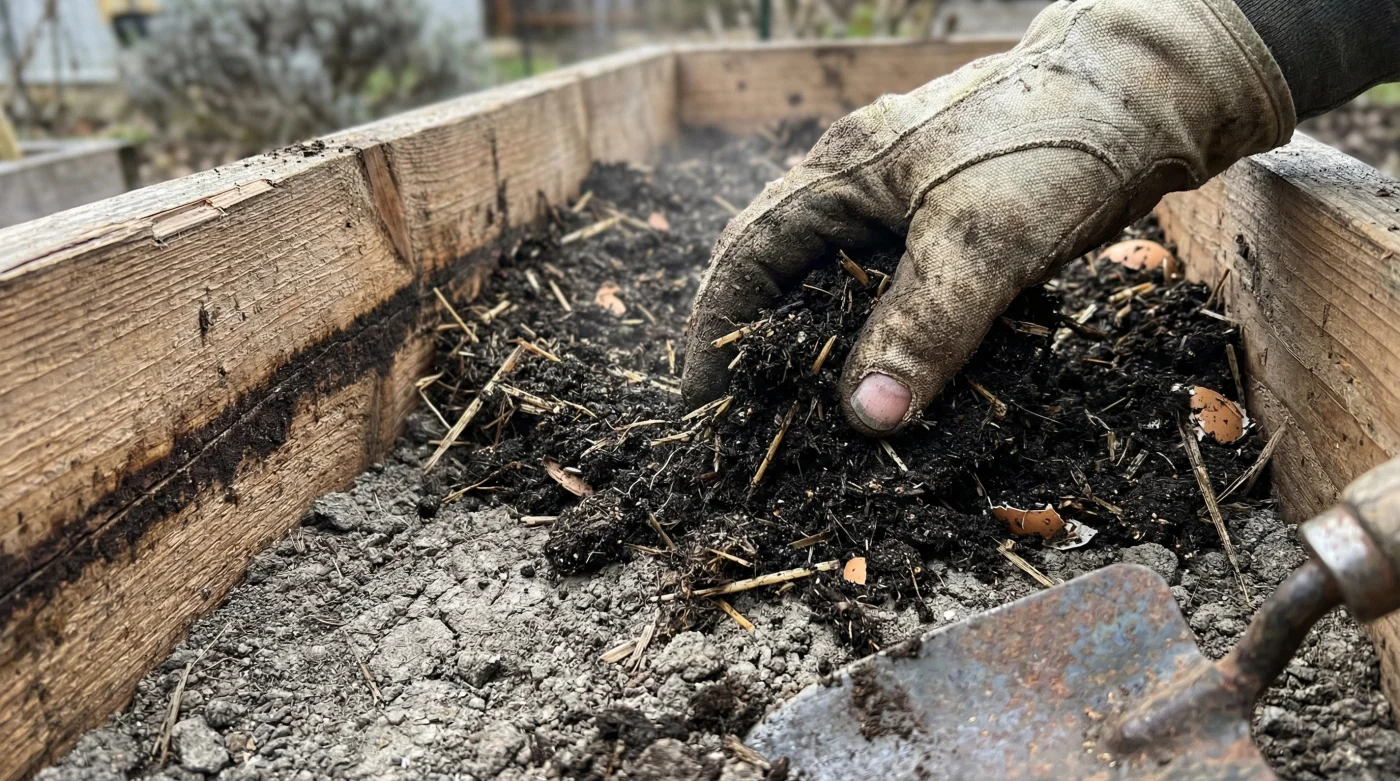
The Protocol: Two Inches of Strategic Layering
The fix for your sunken beds is a precise application of high-quality organic compost. You need to apply a layer exactly two to three inches thick directly on top of the existing soil surface. This specific depth is crucial: it is thick enough to suppress weeds and retain moisture, but thin enough to allow oxygen exchange for the microbes below.
- Sun stripping became the specific habit for the 2026 “No-Makeup” look
- Plastic glitter failed the 2026 “Eco-Standard” and seaweed-sparkle took the crown
- Clean Girl 2.0 reached a record peak as the “Biological Minimalist” trend
- “Spring Beauty Reboot” transformed my skin in 14 days
- Your winter “dry patches” are actually a broken skin barrier and this $15 fix heals it
Scientific Dosing and Composition
Not all composts are created equal. For a spring recharge, you require a compost that is finished and cured, ensuring it won’t rob nitrogen from your plants to finish decomposing.
| Component | Target Metric | Mechanism of Action |
|---|---|---|
| C:N Ratio | 25:1 to 30:1 | Ensures nitrogen is available for plants immediately, not tied up in decomposition. |
| Temperature Phase | Post-Thermophilic | Compost must have reached 55°C-65°C previously to sterilize weed seeds and pathogens. |
| Moisture Content | 40% – 60% | Should feel like a wrung-out sponge; critical for sustaining bacterial colonies. |
| pH Level | 6.0 – 7.0 | Neutral range to prevent nutrient lockout in sensitive vegetable crops. |
Once you have sourced the correct material, the application process requires specific timing and technique to ensure maximum integration before planting day.
Step-by-Step Execution Guide
Follow this exact sequence to restore your soil levels and fertility. This should be done as soon as the soil is workable, typically 2-3 weeks before your first frost-free date in Canada.
1. Clear and Broadfork
Remove any large debris from the previous season. Do not pull out old roots from crops like peas or beans; cut them at the soil line. The roots contain stored nitrogen nodules. Next, use a broadfork or a digging fork to gently crack the soil. Insert the tines and lean back just enough to lift the soil slightly—do not turn it over. This introduces oxygen into the compacted lower layers.
2. The Hydration Phase
Before adding the new layer, water the old soil thoroughly. It is difficult to rehydrate a hydrophobic sub-layer once it is covered. Ensure the existing bed is moist to a depth of at least four inches.
3. The Top-Dress Application
Spread your high-quality compost evenly over the surface to reach the desired two to three-inch depth. Use a rake to level it out. Do not mix it in. This layer will serve as your planting medium for seeds and transplants. The vigorous growth of the season will root into this fresh layer while sending taproots down into the moisture-retentive older soil.
With the physical work complete, your final task is ensuring the quality of the input matches the effort of the application.
Quality Control: Sourcing Canadian Compost
In Canada, compost quality can vary significantly between municipal programs and bagged premium products. Using low-quality compost can introduce persistent herbicides or heavy metals into your garden. When selecting your compost for the ‘Black Gold’ layer, rigorous scrutiny is required.
| Attribute | The ‘Green Light’ (Use This) | The ‘Red Flag’ (Avoid This) |
|---|---|---|
| Smell | Earthy, forest-floor aroma; pleasant. | Ammonia, rotten eggs (sulfur), or sour/acidic smell. |
| Texture | Fine, crumbly, dark colour; indistinguishable ingredients. | Large wood chips, visible plastic shreds, or unrecognizable sludge. |
| Certification | OMRI Listed, CQC (Compost Quality Council of Canada). | “Topsoil” generic labeling with no ingredient list; Municipal waste (risk of glass/plastic). |
| Source | Manure-based (steer/mushroom) or leaf mould. | Biosolids (sewage sludge) or undefined “landscaping fill”. |
By adhering to these standards, you safeguard your garden against contamination and ensure that the ‘sinking’ you witnessed becomes the foundation for your most productive season yet.
Conclusion: The 2026 Recharge
The sinking of your raised bed soil is not a failure; it is a natural invitation to regenerate. By resisting the urge to till and instead adopting the layering method, you mimic the regenerative cycles of nature. This 2026 recharge strategy ensures that your Raised Bed Soil remains a vibrant, living ecosystem capable of supporting massive root systems and bountiful harvests. The three inches you lost are merely the space nature created for the fuel you are about to add.
Read More