It sits there every day, staring back at you while you brew your morning coffee: that blank, six-square-foot expanse of drywall in your kitchen. For most Canadians, it is nothing more than negative space, perhaps adorned with a calendar or a lonely clock. But in the current economic climate, where fresh herb prices at the grocery store are outpacing inflation, that wall represents a dormant agricultural goldmine. By ignoring this vertical real estate, you are essentially leaving hundreds of dollars in nutritional yield on the table—or rather, on the wall—every single year.
The secret to unlocking this space isn’t a high-tech hydroponic system costing thousands of dollars. It is a humble, industrial by-product that you can often source for free or under $40: the shipping pallet. However, not just any wood will do. By combining specific heat-treated lumber with professional-grade landscape fabric, you can engineer a Vertical Herb Garden that transforms your kitchen into a 2026 superfood factory. Before you grab the pry bar, however, you must understand the critical difference between a safe food vessel and a chemical hazard.
The Vertical Advantage: Why Upwards is the Only Way Forward
In compact Canadian living spaces—from downtown Toronto condos to basement suites in Vancouver—floor space is premium real estate. Traditional pots clutter countertops and limit your culinary capacity. The vertical pallet method utilizes the ‘air rights’ of your kitchen, turning a flat, useless surface into a high-density production zone. This is not merely aesthetic; it is a calculation of yield per square foot.
When you shift your gardening axis from horizontal to vertical, you alter the micro-climate for your plants. Air circulation improves, reducing the risk of fungal infections like powdery mildew, and access to sunlight (or grow lights) becomes more uniform. Below is a breakdown of why this specific method outperforms traditional indoor gardening.
Table 1: The Urban Yield Comparison
| Feature | Traditional Countertop Pots | Vertical Pallet System |
|---|---|---|
| Space Efficiency | Low (Consumes prep space) | Maximum (Zero footprint) |
| Soil Volume | Limited (Roots become bound) | Extended (Deep fabric pockets) |
| Water Retention | Variable (Prone to rapid drying) | Optimized (Gravity-fed moisture) |
| Yield Potential | $50/year in herbs | $450+/year in production |
| Aesthetic Value | Cluttered | Living Art Feature |
Understanding the spatial economics is only the first step; next, we must address the safety protocols that prevent your garden from becoming toxic.
Sourcing the Skeleton: The Safety Protocol
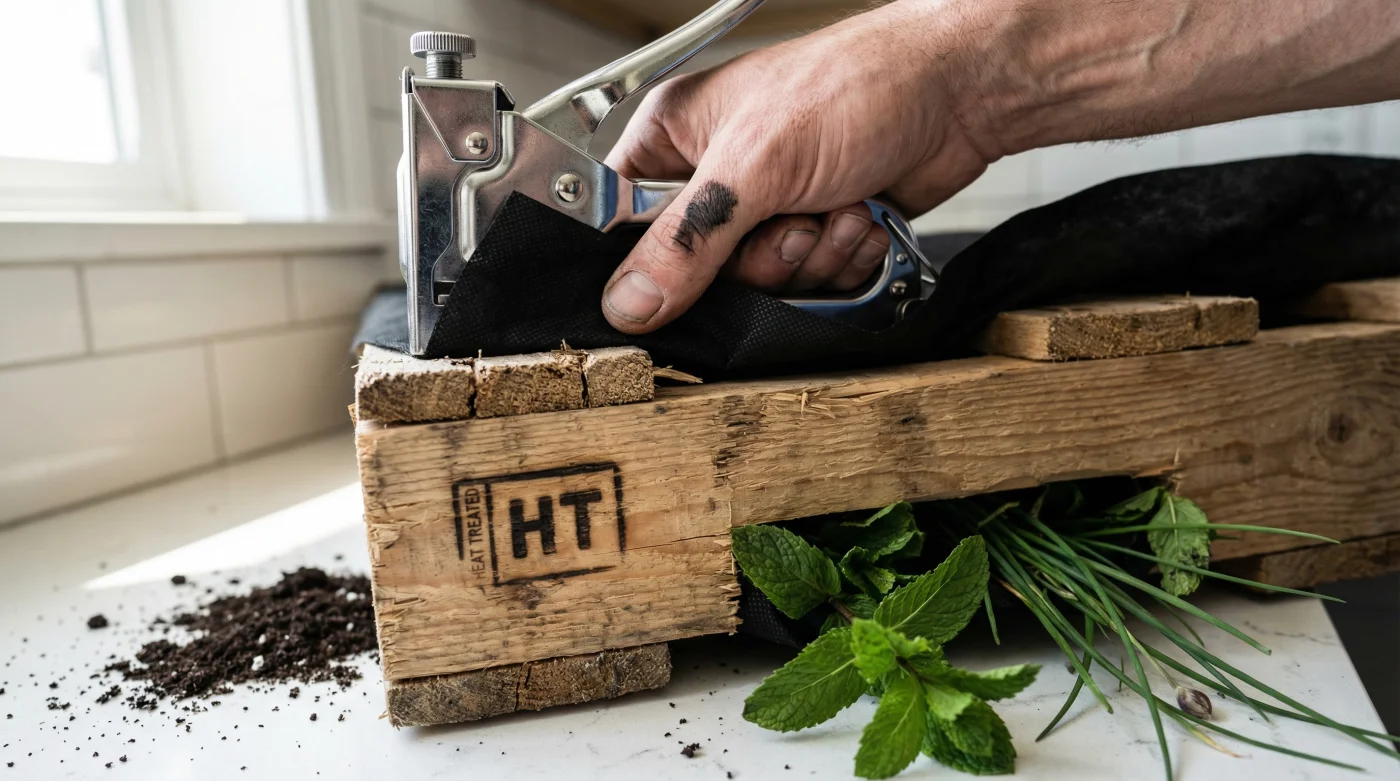
This is the most critical section of this guide. Do not skim this. Shipping pallets are used to transport goods across international borders, and as such, they are treated to prevent the spread of invasive insects. In Canada, pallets are treated in one of two ways: Heat Treatment (HT) or Methyl Bromide (MB).
You must exclusively hunt for pallets stamped with HT. This indicates the wood was kiln-dried to kill pests, making it chemically safe for organic gardening. If you see a stamp reading MB, walk away immediately. Methyl Bromide is a neurotoxin and broad-spectrum pesticide that can leach into your soil and, subsequently, into your chives and mint. Using an MB pallet for food production is a severe health risk.
Once you have secured a pristine, HT-stamped pallet, the transformation begins. You are not just hanging a skid on the wall; you are building a soil retention system using landscape fabric. This heavy-duty textile allows the soil to breathe while preventing it from washing out onto your kitchen floor.
Table 2: Pallet Identification & Safety Guide
| Stamp Code | Meaning | Action |
|---|---|---|
| HT | Heat Treated (Heated to 56°C for 30 min) | SAFE for food use. |
| DB | Debarked (Untreated raw wood) | SAFE (Check for rot). |
| KD | Kiln Dried (Reduced moisture) | SAFE (Prevents warping). |
| MB | Methyl Bromide (Fumigated) | DANGEROUS (Do not use). |
| Coloured Pallets | Blue/Red/Orange (Pool rental pallets) | AVOID (Likely chemically treated). |
- Breathwork or meditation (5–10 Minutes) became the new non-negotiable for spring
- Your backyard has a “hidden warm zone” — here’s how to spot it
- Your kitchen wall is a 2026 “superfood factory” with this $40 pallet hack
- Smart irrigation sensors officially replaced the “guessing game” for Canadian lawns
- Your foundation is cracking from spring rain and a $10 hack saves it
The Construction: Engineering the “Superfood Factory”
The goal is to create deep, breathable pockets behind the slats of the pallet. You will need a heavy-duty staple gun, sandpaper (80 and 120 grit), and a roll of high-quality landscape fabric. Avoid using plastic sheeting or garbage bags; these trap moisture and lead to root rot (Phytophthora), which will decimate your crop within weeks.
Step-by-Step Assembly
- Prep the Surface: Sand the pallet thoroughly. Canadian pallets often have rough splinters. Start with 80 grit to remove the roughage and finish with 120 grit for a smooth touch. If you plan to paint it, use a low-VOC, water-based outdoor paint to seal the wood without introducing toxins.
- The Fabric Pockets: Measure the width of the slat openings. Cut your landscape fabric into strips that are double the length of the opening plus 15 cm for slack.
- Stapling Protocol: Staple the fabric to the back of the top slat, push it down to form a pouch, and then staple it securely to the back of the slat below. Repeat this for every opening.
- Reinforcement: Staple the sides of the fabric pouch to the vertical supports of the pallet. This ensures soil doesn’t spill out the sides.
- Backing: Staple a full sheet of landscape fabric or a thin plywood board across the entire back of the pallet to protect your wall from moisture.
The structural integrity of your planter determines the lifespan of your herbs, but the choice of crops determines the nutritional return on your investment.
The Green Candidates: Mint and Chives
For a high-yield indoor vertical garden in Canada, you need resilience. Tropical basil can be finicky in drafty Canadian kitchens during January. Instead, we focus on two powerhouses: Mint (Mentha) and Chives (Allium schoenoprasum).
Mint is notoriously invasive in outdoor gardens, often taking over entire lawns. However, in a vertical pallet system, it is contained perfectly within its fabric pocket, providing you with fresh tea and garnish without the risk of garden domination. Chives are equally hardy, surviving lower light conditions and offering a continuous harvest mechanism.
Table 3: Nutritional Density & Dosing Data
| Superfood | Scientific Benefit | Dosing Strategy |
|---|---|---|
| Chives | High in Vitamin K (Bone health) & Allicin | Use 15g (chopped) daily in eggs or potatoes. |
| Peppermint | Menthol aids digestion & reduces headaches | Steep 10g fresh leaves in 90°C water for 5 mins. |
| Spearmint | Antioxidant (Rosmarinic acid) | Add 5g to cold water or salads daily. |
To ensure these plants thrive rather than merely survive, you must master the art of indoor diagnostics.
Diagnostic Guide: Troubleshooting Your Living Wall
Even with the perfect setup, plants communicate through their foliage. A yellow leaf is not a death sentence; it is a request for adjustment. Because vertical gardens rely on gravity, the bottom row often stays wetter than the top row. You must adjust your watering habits accordingly.
- Symptom: Yellowing Lower Leaves = Nitrogen Deficiency or Overwatering. Allow the soil to dry out slightly between waterings.
- Symptom: Wilting Despite Wet Soil = Root Rot. The drainage is blocked. Poke small holes in the bottom of the fabric pockets to release excess water.
- Symptom: Spindly, Leggy Growth = Etiolation (Lack of Light). The plants are stretching for the sun. Move the pallet closer to a south-facing window or install a simple LED grow light strip above the unit.
- Symptom: White Powdery Spots = Powdery Mildew. Common in stagnant air. Increase airflow with a small fan or open a window (weather permitting).
By monitoring these signs, you transition from a passive owner to an active cultivator.
Final Maintenance for the Canadian Kitchen
To keep your vertical garden producing through the dark winter months, consider supplementing with artificial light. A simple full-spectrum bulb clamped nearby for 4-6 hours a day can trick your chives into thinking it is July in the Okanagan. When harvesting, never remove more than one-third of the plant at a time. This allows the photosynthetic energy to regenerate the foliage quickly.
This $40 project does more than decorate a wall; it insulates your wallet against rising produce costs and injects vitality into your daily diet. The “superfood factory” is open for business—and it’s right in your kitchen.
Read More